Mommysavers

Frugal Moms Living Well for Less

  • Facebook
  • Instagram
  • Food
    • Recipes
      • 5 Ingredients or Less
      • 30 Minute Meals
      • Freezer Meals
      • Appetizers
      • Breakfast
      • Lunch
      • Dinner
      • Dessert
      • Snacks
    • Cooking Techniques
    • Leftovers and Preservation
  • Home
    • Cleaning
    • Decor and Design
    • DIY Projects
    • Money
      • Couponing
      • Personal Finance
      • Shopping Tips
    • Simple Living
  • Family
    • Fun
    • Parenting
    • Travel
  • A Better You
    • Health and Fitness
    • Lifehacks
    • Fashion
    • Motivation and Productivity
    • Entrepreneurialism
  • Holidays
    • Thanksgiving
    • Christmas
    • New Year’s Eve
    • Valentine’s Day
    • St. Patrick’s Day
    • Easter
    • Mother’s Day
    • Father’s Day
    • Halloween
  • Special Deals

Homemade Photo Gift Tags

November 28, 2010 by Susie Chadwick 1 Comment


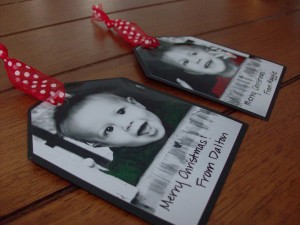
Here’s a simple way to turn a photo into a personalized gift tag. I love how these turned out and they are very quick and easy to make.

Take advantage of some of these free photo offers to order extra prints of your family. You can use them to make these adorable, personalized gift tags for your neighbor gifts.

  • New Snapfish Customers Get 50 Free Prints through this link
  • New SeeHere Customers Get 50 Free with promo code: prints-6
  • New Kodak Gallery Customers Get 50 Free premium prints
  • New Clark Color Customers Get 40 Prints through this link
  • New Shutterfly Customers Get 50 Free Prints through this link
  • You make this craft you will need:

    • a photo
    • scissors and/or a paper trimmer
    • cardstock, if desired
    • adhesive
    • a hole punch (I used a 3 hole punch)
    • ribbon
    • permanent pen

    Trim your photo down if you want a smaller tag. I cut the photo on the left in half and used each half. Trim off the top two corners.

    Mount your photo tag on cardstock, if desired. Don’t use black if you plan on writing on the back! Use the hole punch to punch a hole in the top center of the tag.

    Tie a ribbon through the hole. Write your message on the photo or on the back with permanent pen. Unless you are writing on cardstock on the back, be sure to use permanent ink, or it will smear.

    Share
    Tweet
    Pin5K
    5K Shares

    Filed Under: Decor and Design Tagged With: gift ideas

    « Kids Christmas Craft: Homemade Cinnamon Dough Ornaments
    Homemade Glass Stove Top Surface Cleaner »

    Comments

    1. Joyce Hill says

      November 2, 2012 at 9:47 pm

      I like your tags they are awesome. I will use them on my xmas gifts.

      Reply

    Leave a Reply Cancel reply

    Your email address will not be published. Required fields are marked *

    Recipe Rating


    About Mommysavers

    Kimberly Danger established Mommysavers.com in March 2000 as a way to channel her creative energy while raising her kids. Initially an online discussion board, the website evolved into a comprehensive platform offering money-saving tips, deals and budget-friendly recipes and tips for frugal moms. Read More…

    View My Blog Posts

    [instagram-feed feed=1]

    Tags

    21 Day Fix recipes activewear Advent amazon prime christmas treat christmas treat ideas clean eating fix clean eating recipe clean eating recipes crock pot recipes copycat recipes Costco deals crafts crock pot meals date night ideas declutter decor ideas free printables frugal activities frugal recipe furniture gifts for men gratitude gymboree halloween cupcakes halloween party halloween treats healthy healthy menu plan heathy recipes holiday toys homemade christmas Instant Pot kids celebration Michael's deals oatmeal old navy deals oreos organize Shakeology starbucks stocking stuffer ideas teacher gifts turkey cupcakes walmart deals zulily

    Copyright © 2025 · MommySavers.com · All Rights Reserved.